Introduction
Connecting the Facebook Conversion API sends your conversion data directly from Visiopt's server to Meta, bypassing browser-based limitations like ad blockers, iOS privacy restrictions, and cookie blocking.
This means Meta receives more complete and accurate purchase data, which improves campaign attribution, lowers your cost per result, and gives Meta's algorithm better signals to find buyers.
Before You Begin
Two things must be in place before starting this setup:
1. Add the Base Meta Pixel base code to your Landing page only.
Most landing pages already have Facebook PageView tracking code.
Where to find your Meta Pixel base code:
- Go to business.facebook.com/events_manager
- Select your dataset (pixel) from the left sidebar
- Click Settings
Click the Set up button under "Gather website events from browser activity" to access the manual install flow, where your Pixel ID and base code will be provided with your ID pre-filled.
Your Pixel ID is also visible directly on the Settings tab — it is a 15–16 digit number you will need later.
- The full base pixel code with your Pixel ID pre-filled will be provided during the setup flow.
1a. Edit the page view portion of the code as follows:
In your Meta Pixel base code, find this specific line:
❌ Old (Typical) Code
fbq('track', 'PageView');
✅ Required Code:
Replace only that line with the Required Code block below. Leave the rest of your pixel code exactly as it is.
Visiopt Enhanced Version (Replace Existing Pixel Code) This version adds a unique Event ID to each PageView, which prevents Meta from counting the same conversion twice when both the Pixel and the Conversions API are active.
var I = parseInt((new Date()).getTime() / 1000);
var FB_eventid = I.toString();
setCookieVisi("FBEventId", FB_eventid, 365);
fbq('track', 'PageView', {}, { eventID: FB_eventid });
function setCookieVisi(name, value, days) {
 var expires = "";
 if (days) {
   var date = new Date();
   date.setTime(date.getTime() + (days * 24 * 60 * 60 * 1000));
   expires = "; expires=" + date.toUTCString();
 }
 document.cookie = name + "=" + (value || "") + expires + "; path=/";
}
2. Do not create any Facebook Pixel-based conversion events inside Meta Events Manager.
If you set up conversion events directly in Meta (such as a Purchase event triggered by a URL), Meta will count both the browser-side event and the server-side event from Visiopt - resulting in duplicate conversions and inflated reporting.
Let Visiopt handle all conversion event firing through the API.
Part 1 - Get Your Pixel ID and Access Token
Before connecting Visiopt to the Facebook Conversion API, you need two pieces of information from Meta: your Pixel ID (also called Dataset ID) and an Access Token. Both are found in Meta Events Manager.
Don't have a Meta Pixel yet? See the Appendix at the end of this article to create one first, then return here.
Step 2 - In the left sidebar under
Datasets, click on your dataset. It will be listed by name with its ID displayed below it (e.g.,
mycompany_Fit_v1 — ID 1210172790559887).

Step 3 - Click the Settings tab at the top of the page.
Step 4 - Under the Details section at the top of the Settings page, locate your Dataset ID. This is your Pixel ID. Copy it and save it - you will need it in Part 2.
Step 5 - Scroll down the Settings page until you reach the Conversions API section.
Step 6 - Under
Set up direct integration, you will see two options. Select
Set up with Dataset Quality API - Recommended.
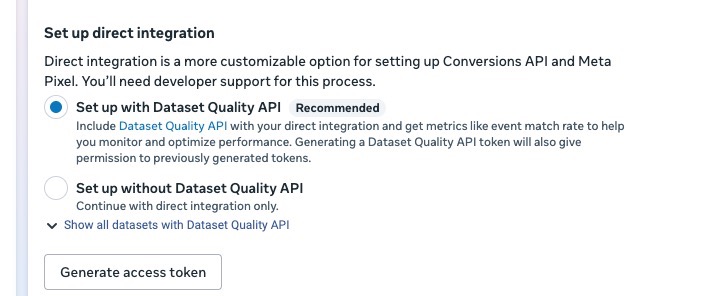
Step 7 - Click Generate access token. A token will appear below the button. Copy it and save it alongside your Dataset ID.
Note: Keep your Access Token private. Anyone with this token can send events to your Meta dataset on your behalf. Do not share it publicly or include it in any client-side code.
You now have everything you need to connect Visiopt. Proceed to Part 2.
Part 2 - Connect in Visiopt
1. In Visiopt, go to the campaign → Step 3 → select Facebook → sign in:

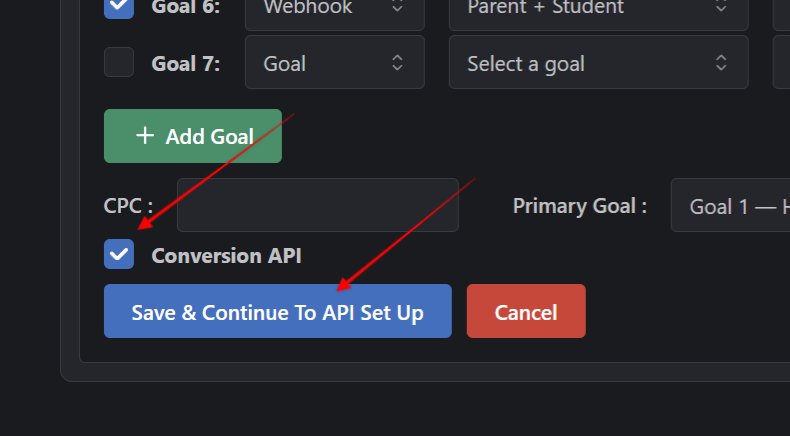
2. Check the Conversions API checkbox and hit "Save and Continue to API Set Up:
3. Enter Pixel ID and Access Token:

4. Add Goals - match each goal page to the correct Facebook event:
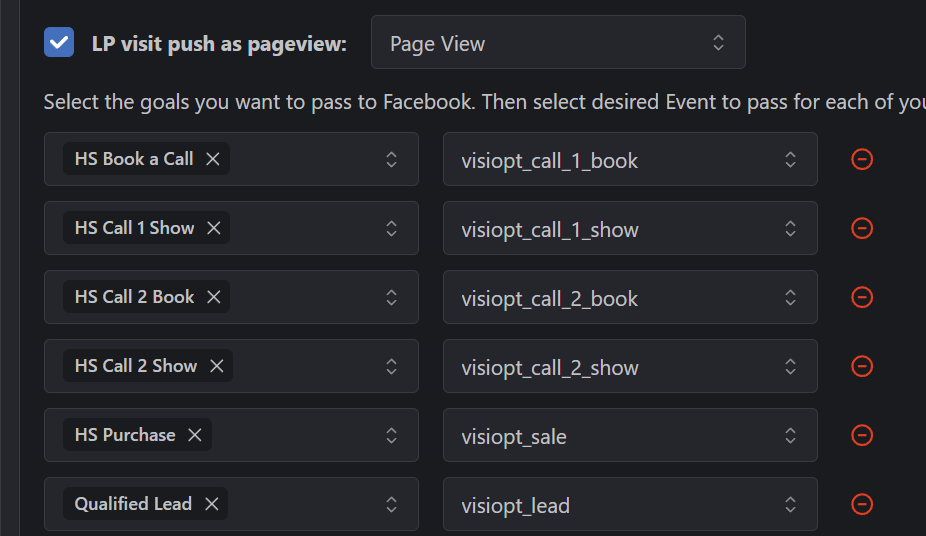
5. Check off send LP visit push as pageview and choose your LP
6. Choose the attribution you wish to use. We recommend first click attribution.
7. Do not check off send all conversions. We recommend leaving this unchecked so you only send conversions specifically attributed to this campaign.
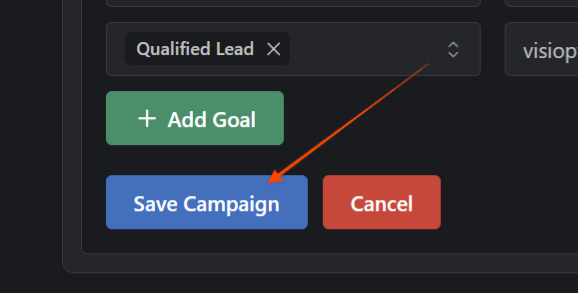
8. Save the campaign:
 Part 3 - Two Recommended Optimizations
1. Attach a webhook to the purchase event so Visiopt can pass the customer email to Meta for better matching.
2. Turn on Automatic Advanced Matching in Meta Events Manager → Settings

What to Expect
Conversions appear in Meta within 1–24 hours (usually 1–2 hours)
Part 4 - Confirming Events Are Being Received By Meta
After saving your campaign in Visiopt, allow up to 24 hours for the first conversion events to appear in Meta.
Visiopt sends data to Meta in real time, but Meta's interface takes time to process and display it.
Step 2 - In the left sidebar, click Datasets and select your dataset.
Step 3 - Click the
Overview tab and then click View event activity. You will see a list of events being received. Look for the events you configured in Visiopt — for most campaigns this will be
Purchase and
PageView. The
Integration column should show
Conversions API next to each event.

Step 4 - Click on the
Purchase event to expand it, then click
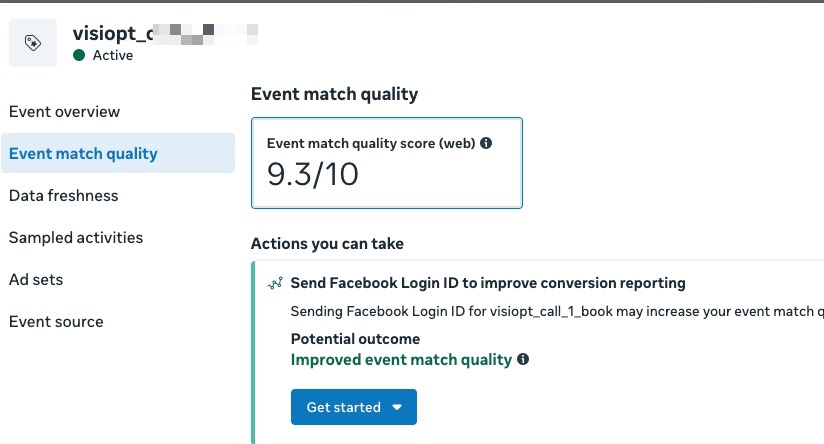
View Details. Here you will see two key metrics:

-
Event Match Quality - This score (out of 10) measures how well Meta can match your conversion events to actual Meta users. A score of
8 or above is considered very good. If your score is below 6, consider adding a webhook in Visiopt to pass customer email data, which significantly improves matching.
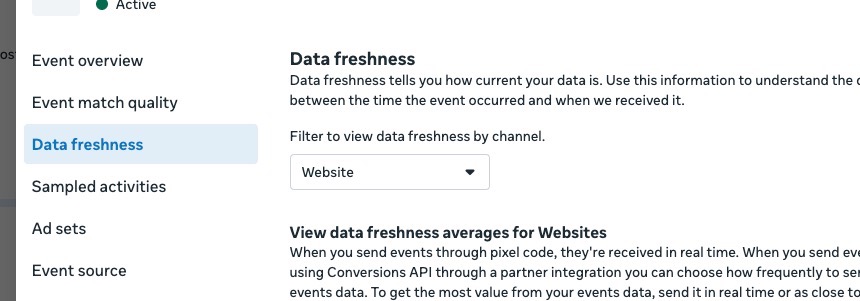
-
Data Freshness - This should show
Real Time, confirming events are arriving as they happen rather than being delayed.
Why your Visiopt numbers may differ from Meta's numbers
Visiopt provides accurate, real-time conversion attribution based on the attribution model you selected in your campaign settings. Meta's reporting, by contrast, has well-known limitations ... it uses its own attribution window, applies last-touch logic by default, and introduces reporting delays that can make numbers appear inconsistent day to day.
What you are seeing in Events Manager is the raw data Visiopt is sending to Meta... this is accurate. What you see in Meta's campaign reports is Meta's own interpretation of that data, which is subject to modeled attribution, delayed processing, and known discrepancies. Meta's campaign reports are notoriously unreliable for precise conversion counting.
Use Visiopt for all decisions and conversion accuracy. Use Meta's Events Manager only to confirm that events are arriving and the match quality score is healthy. Do not rely on Meta's campaign-level conversion reports as your source of truth.
Appendix — Creating a New Meta Dataset (First-Time Setup Only)
Only follow these steps if you do not yet have a Meta Pixel or dataset connected to your ad account. If you already have a dataset, return to Part 1.
Step 2 - In the left sidebar, click Connect data (or the + Connect Data button at the top of the sidebar).
Step 3 - On the "Connect a new data source" screen, select Web and click Next.
Select Web to connect your website and track activity such as page views, add to cart, and purchases. Do not select App, Offline, CRM, or Messaging.
Step 4 - Enter a name for your dataset — use your business or product name (e.g., Perfect Fit) — and click Create.
Step 5 - Enter your website URL and click Next.
Step 6 - You will be taken through Meta's setup wizard. Select Do it yourself and click Next, then select Meta Pixel and Conversions API and click Next, then select Set up manually and click Next.
Step 7 - Click through the remaining screens and click Finish when prompted. You do not need to complete the full wizard - Visiopt handles all event configuration automatically.
Step 8 - Your new dataset will now appear in the left sidebar under Datasets. Return to Part 1 to get your Pixel ID and generate your Access Token.
Comments
0 comments
Please sign in to leave a comment.